Remove names, IDs and other identifying details from your scans on your own computer, before you upload them to TraceOrg. This guide uses DicomCleaner, a free tool for Windows and Mac. The first setup takes about 15 minutes; after that, each subject takes a few minutes.
Install DicomCleaner (once)
Set the options (once)
Clean one subject's scans
Upload the ZIP file to TraceOrg
If your institution has its own de-identification rules, check with your IRB or privacy office first.
What gets removed, what stays
The settings in this guide remove everything that identifies a person and keep only what TraceOrg needs to measure the kidneys and liver.
Removed
Name, patient ID, birth date and accession number
Hospital, doctor and scanner names
Age, sex, height and weight. You enter birth year, sex and height in TraceOrg instead.
Free-text notes and hidden vendor fields, which may contain names or IDs
Kept
The images, pixel size, slice thickness and position. TraceOrg needs them to measure volumes.
Series description, protocol name, image type and scan settings. They let TraceOrg pick the right series, such as T2-weighted MRI.
Shifted
Scan dates. The first scan moves to January 1 of the same year. The time between scans stays exact, so age, Mayo class and growth rate stay correct.
Step 1. Install DicomCleaner
DicomCleaner is free and made by PixelMed. You install it once. All downloads:
DicomCleaner for Windows (about 85 MB, Java included): https://www.dclunie.com/pixelmed/software/winexe/DicomCleanerWithOwnJRE.zip
DicomCleaner for Mac: https://www.dclunie.com/pixelmed/software/macexe/DicomCleanerMac.zip
Java 8 for Mac (choose macOS x64): https://www.java.com/en/download/manual.jsp
DicomCleaner home page: http://www.pixelmed.com/cleaner.html
Windows
Download DicomCleaner for Windows (link above). It includes Java, so nothing else is needed.
Right-click the downloaded ZIP and choose Extract All, then Extract.
In the new folder, double-click DicomCleaner.bat. If Windows says "Windows protected your PC", click More info, then Run anyway.
A black window opens first, then DicomCleaner. Leave the black window open while you work.
Mac
DicomCleaner needs the Intel (x64) version of Java 8, even on Macs with Apple chips.
Install Java: open the Java download page (link above), click macOS x64, open the downloaded file and follow the installer. Choose macOS x64, not macOS ARM64. DicomCleaner will not start with the ARM64 version.
Download DicomCleaner for Mac (link above). Double-click the ZIP to unzip it.
Drag DicomCleaner into your Applications folder, then double-click it there.
During setup, your Mac may show two messages. Handle each one as it appears:
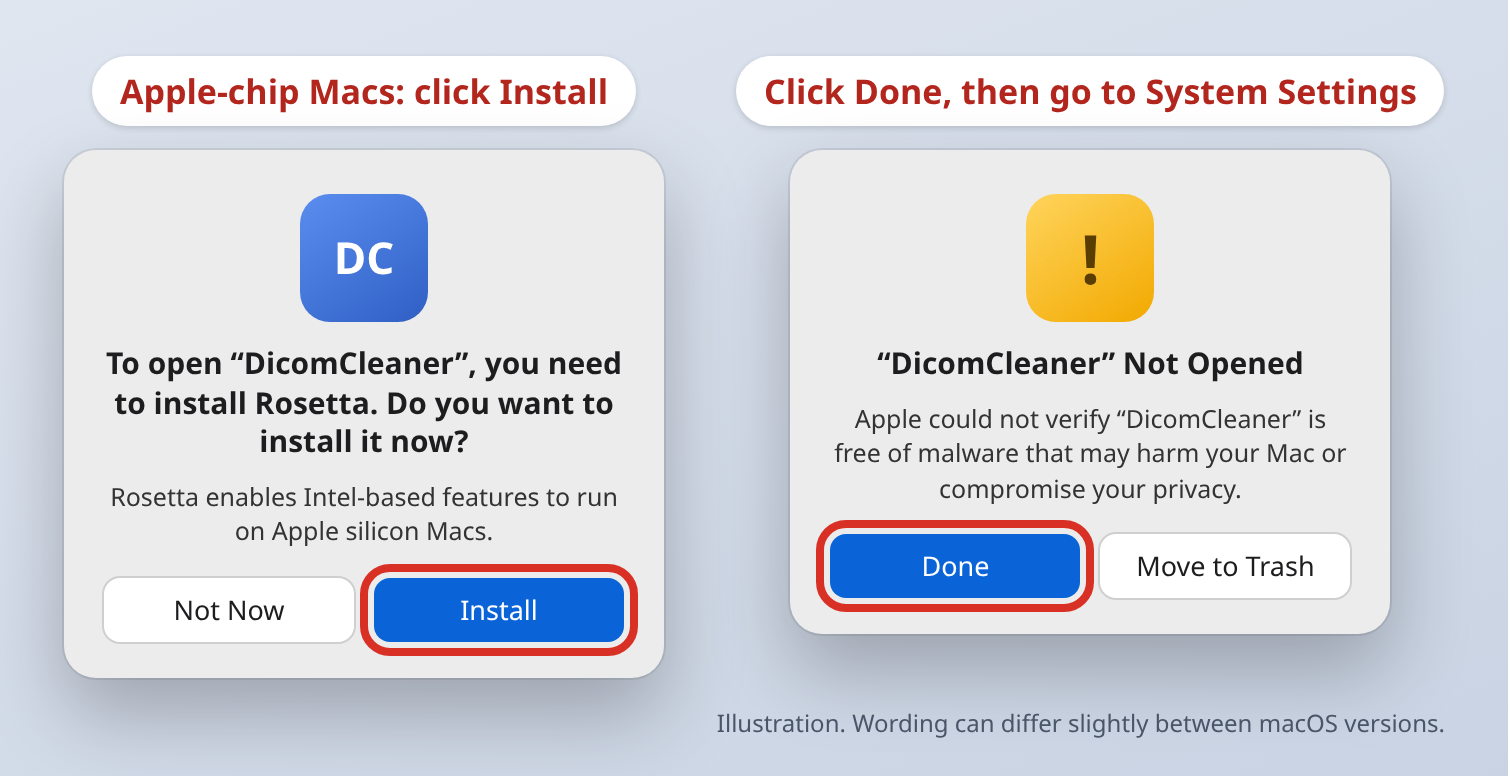
"To open DicomCleaner, you need to install Rosetta" (Macs with Apple chips only). Rosetta lets your Mac run Intel apps. Click Install, enter your password, then open DicomCleaner again.
"DicomCleaner" Not Opened or "DicomCleaner cannot be opened". This appears because DicomCleaner is not registered with Apple. Click Done or Cancel (not Move to Trash), then open System Settings, click Privacy & Security, scroll down to Security, and click Open Anyway next to "DicomCleaner was blocked". Confirm with your password or Touch ID. If asked again, click Open Anyway or Open.
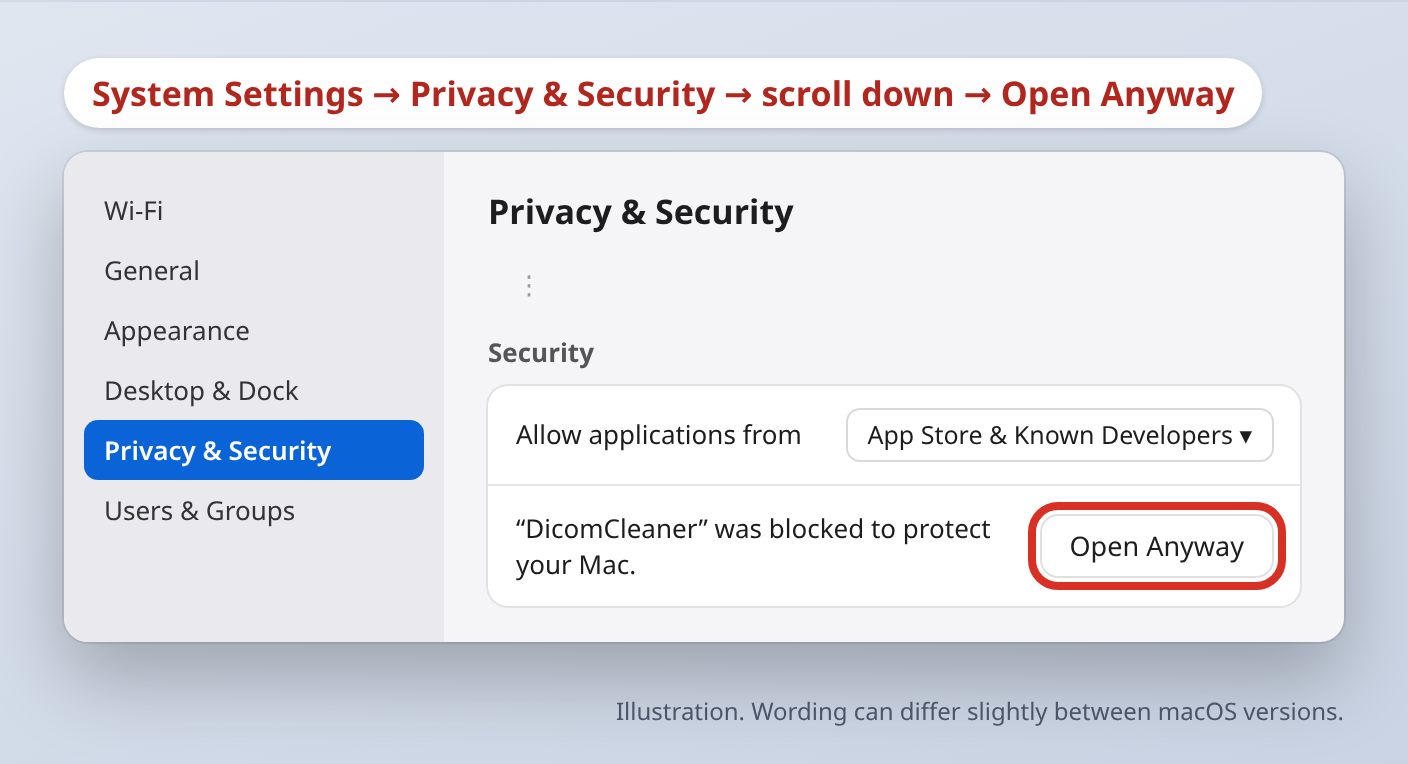
You only do this once. After that, DicomCleaner opens normally.
Step 2. Set the options
Set the boxes in the DicomCleaner window as shown below. Two boxes must stay off: series description and protocol name. TraceOrg uses them to find the right series.

Replace and dates
Patient's Name: on. You type the subject code in Step 3.
ID: on, with the same subject code.
DOB: off.
Accession #: on, with the text box empty.
Move earliest date to: on. You set the date in Step 3.
Turn these on
Remove all unreplaced identities. Required: most other boxes do nothing without it.
Remove descriptions
Remove patient characteristics
Replace all UIDs
Remove unsafe private attributes
Remove device identifiers
Remove institution identifiers
Add contributing equipment
Zip exported files
Keep these off
Remove series description. TraceOrg needs it.
Remove acquisition protocol name. TraceOrg needs it.
Remove manufacturer, and every other box not listed above
DicomCleaner remembers these settings, so you set them once. If other people use the same computer, check them again before you start.
Step 3. Clean one subject's scans
Clean one subject at a time, with all of that subject's visits together. This keeps the time between scans correct.
Click Import and choose your CD drive, a folder, or a DICOMDIR file. The scans appear in the Original list.
In the Original list, select every scan of one subject: all visits. Hold Ctrl (Windows) or Command (Mac) to select more than one. Leave out screenshots, dose reports and scanned documents. They often show the patient's name inside the image, and TraceOrg does not use them.
Type the subject code, such as PKD-001, in both Patient's Name and ID. Use the same code you use in TraceOrg.
Click Earliest Year. The date box next to "Move earliest date to" changes to January 1 of the first scan's year, such as 20210101.
Click Clean. Cleaned copies appear in the Cleaned list. Your original files are not changed.
Click a few cleaned images to look at them. If you see a name or ID written on an image, do not upload that series.
In the Cleaned list, select this subject's scans, leaving out any series from step 6, and click Export. Choose an empty folder.
DicomCleaner saves a file called export.zip in that folder. Rename it right away, for example to PKD-001.zip. The next export to the same folder would replace it.
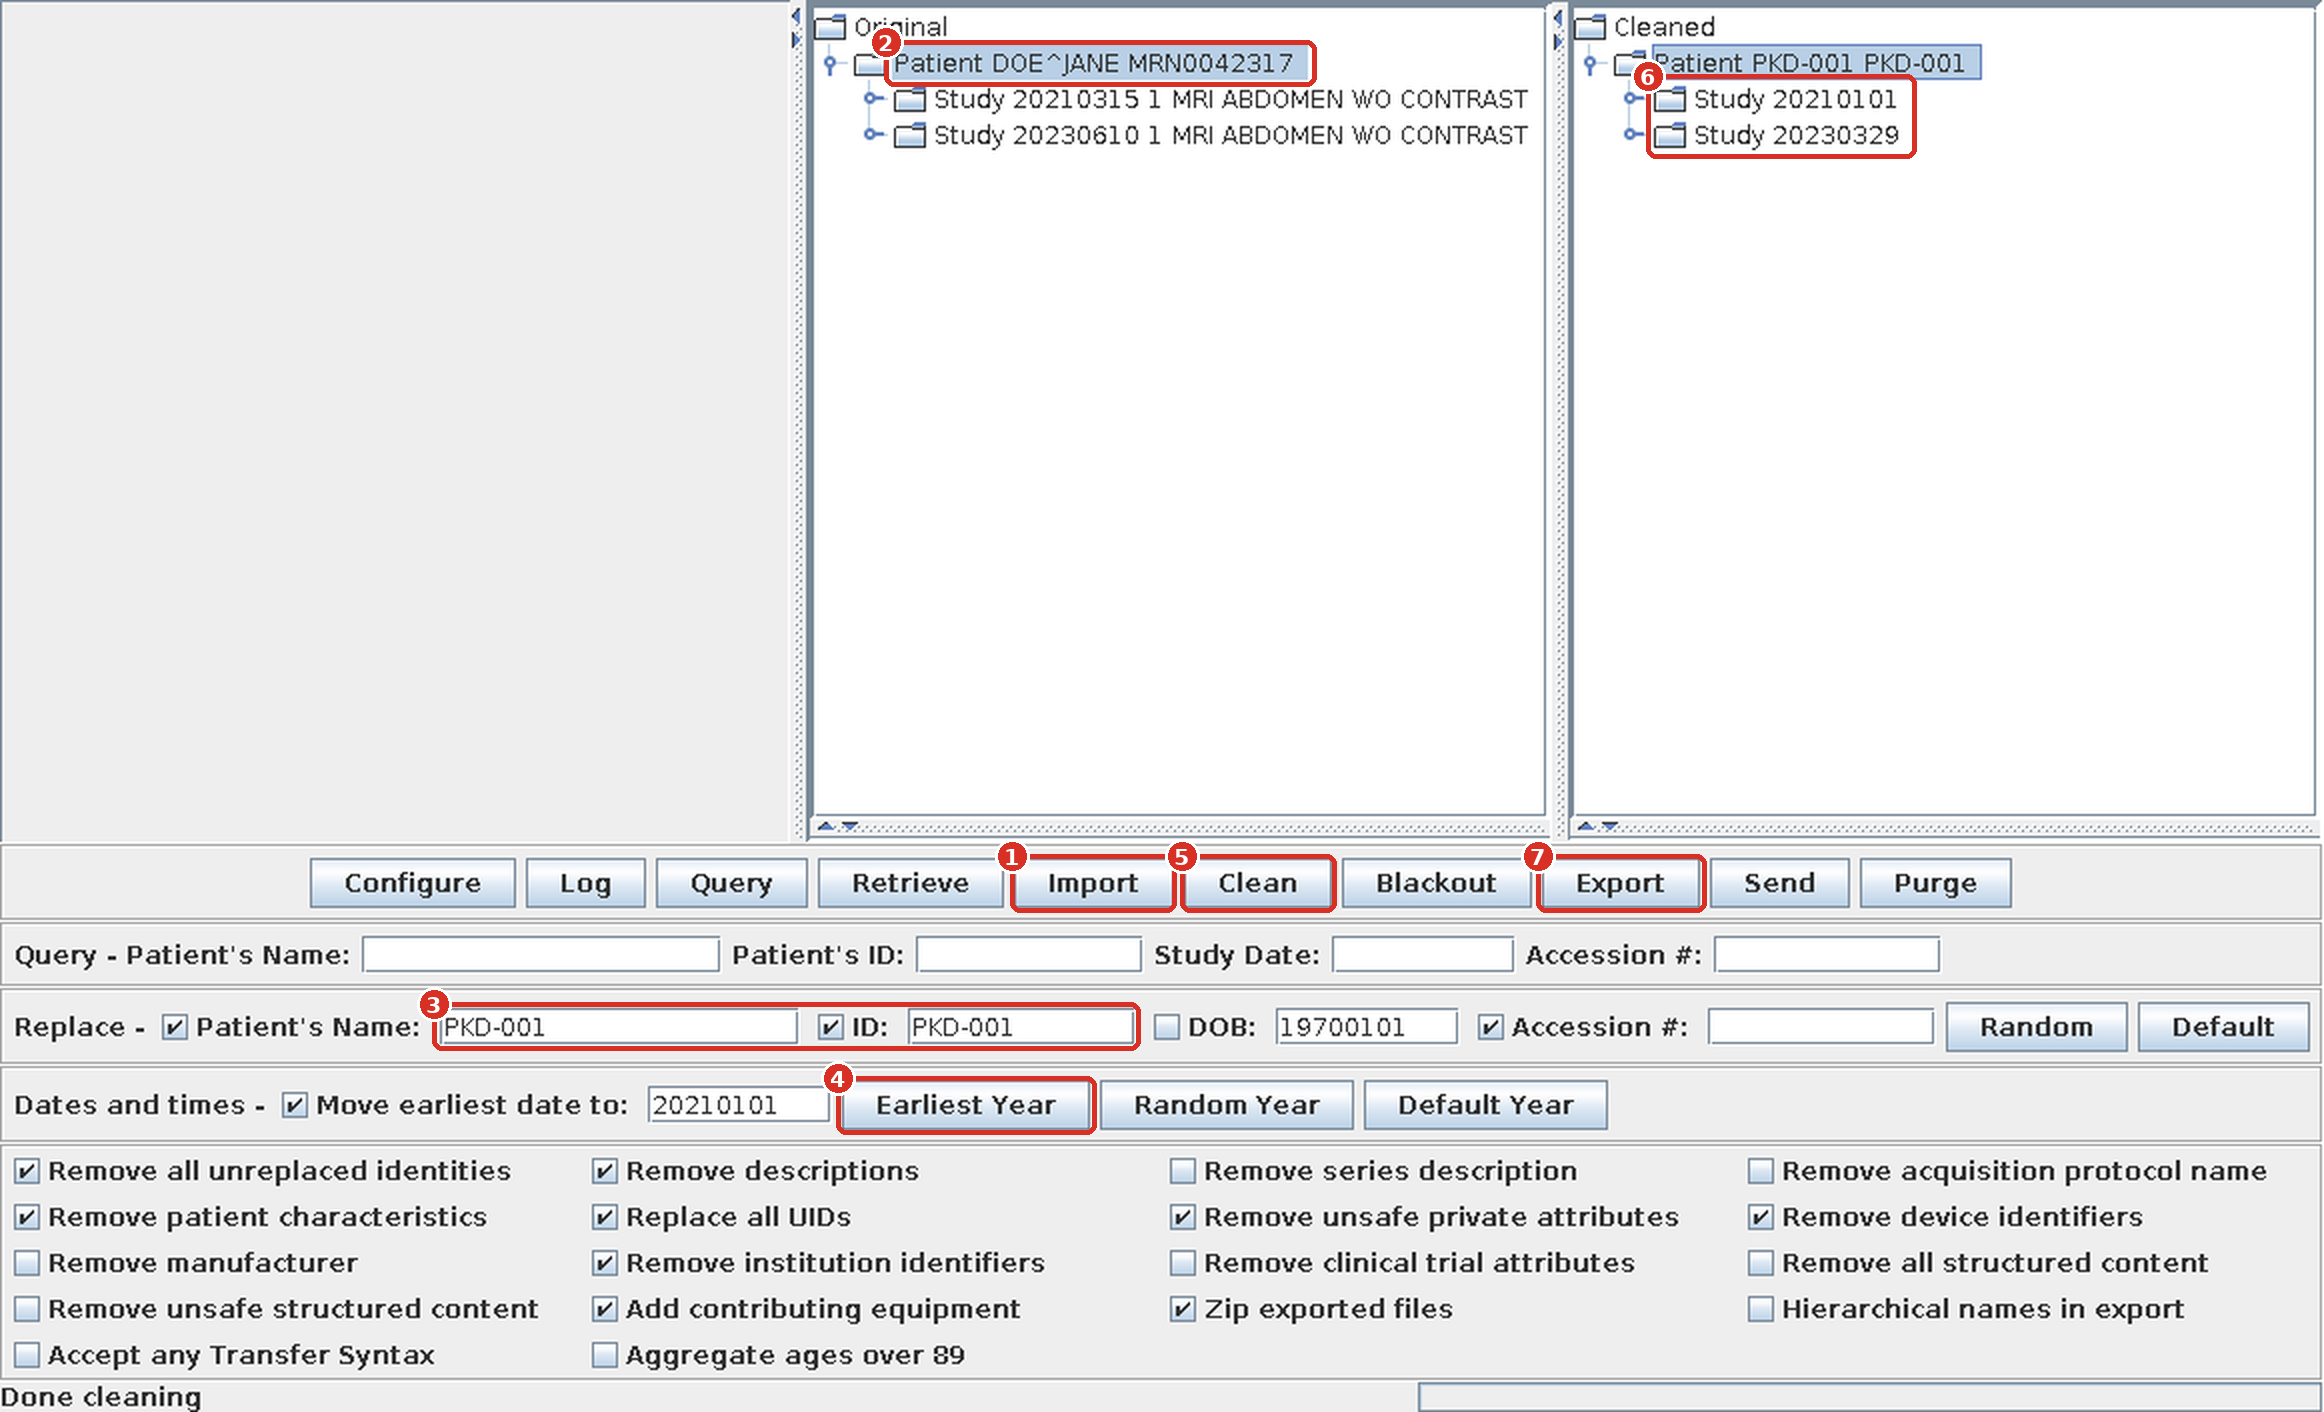
The numbers in the picture match the steps above. The patient is made up. After cleaning, the name becomes PKD-001 and the two visits move to 2021-01-01 and 2023-03-29, still 817 days apart.
Step 4. Upload to TraceOrg
In TraceOrg, click Upload study.
Choose the subject, or create a new one. For a new subject, enter the code you typed in DicomCleaner, such as PKD-001, as the Pseudo subject name and Subject ID. Never use a real name. Also enter Birth year and Height (m), which TraceOrg needs to calculate age, height-adjusted kidney volume and Mayo class, and Sex if you have it.
Drop the ZIP file, such as PKD-001.zip, into the upload area and start the upload.
TraceOrg shows the shifted dates, so the first scan appears as January 1. This is expected.
Adding a later scan for the same subject
When a new follow-up scan arrives, clean it together with that subject's first scan: select both in Step 3, click Earliest Year, then Clean. The dates then shift by exactly the same amount as before. Export and upload only the new scan.
Keep the original files of each subject's first scan so you can do this.
If something goes wrong
Mac: DicomCleaner does not start. Check that you installed Java macOS x64, not ARM64. Install the x64 version and try again.
Mac: no Open Anyway button. The button shows for about an hour after you try to open the app. Double-click DicomCleaner again, then go back to Privacy & Security.
Windows: nothing happens after double-clicking DicomCleaner.bat. Extract the ZIP first (Step 1). It does not run from inside the ZIP.
Some images are missing after Import. Turn on Accept any Transfer Syntax and import again. Some CDs use compressed images.
TraceOrg cannot find a usable series. Check that Remove series description and Remove acquisition protocol name were off, then clean and upload again.